- After Effects Tutorial
How to Make Halftone Effect in After Effects And FilmoraPro

Mar 17,2020• Proven solutions
Do you remember Pete Warden’s After Effect plugin? It was a complete mix of amazing video effects and one of the best one was the halftone effect. It is often discussed on forum. Do you wish to revive the halftone effect as a plugin? Generating a halftone effect is modern and vintage style. Do you know how to do it? In this article, we will let you know how to make halftone after effects in after effects.
How to make halftone effect easily
It is difficult to make halftone effect in After Effects, so we highly recommend using FilmoraPro. You can use it to make amazing effects easily. For halftone effects, you just need to drag and drop the effects to video clip. Check the steps below to find how to make halftone effect in FilmoraPro.
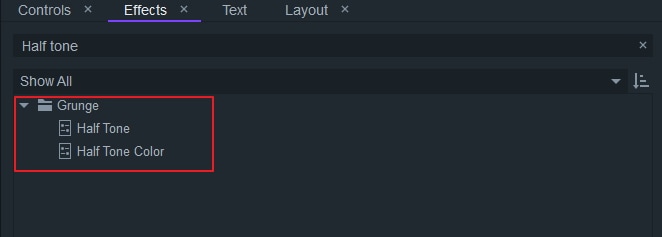
Step 1: Drag and drop halftone effect to timeline
Import your video clip to timeline. Search "half tone" in the effects panel. You will find it is below the Grunge effect tab. Drag half tone and half tone color effects onto video clip in the timeline.
Step 2: Adjust halftone effect settings
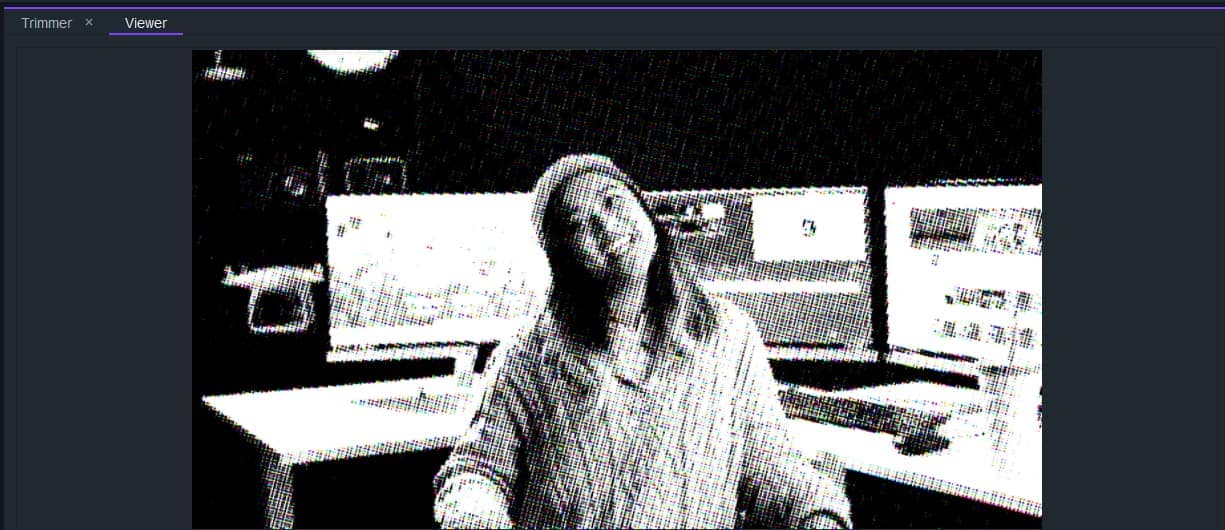
Go to controls panel. You can adjust the half tone preset. Just pick the one you like. The same is with half tone color preset. You can adjust its angle, dot/background color, smooth source and more to make the half tone effect amazing.
Now download it to have try (free)!


Part 1: How to Make Halftone in After Effects
Step 1: Creating a New Composition
Create a new composition at 1920x1080 with a white solid color compsize. Name the file "Background". Make another solid compsized named “Grid”. From this Grid go to Effect and click on Simulation and then, the CC Ball Action. From the control effect Ball Action change ball size to 30 and grid spacing to 5. Go to the Effect option and click Channel and then invert. Change composition of balls from white to black. Precompose the “Grid” solid.Ensure all the attributes are moved to the pre-comp. Name it “Grid”. After naming, import the footage you wish to create halftone effect.
Step 2: Add Effects
Bring it into the composition and then precompose it, naming the precomp “Footage”. Turn off the visibility for the footage precomp. Duplicate the footage precomp and then apply an Invert (Effect > Channel > Invert) to the duplicate. Select the grid layer and go to Effect > Blur & Sharpen > Camera Lens Blur. In the effect controls, change the Blur Map Layer to the inverted footage. In the drop-down next to it switch from Source to Effects and Masks. It ensures to use the Invert effect on the footage. Add a Levels (Effect > Color Correction > Levels) to the grid layer. From levels controls, change the channel to Alpha. Adjust the input black value to 45 and input white value to 50. Keep the grid layer selected apply a Gaussian Blur (Effect > Blur & Sharpen > Gaussian Blur) and set the Blurriness to 5. Apply another Levels effect and change the channel to Alpha. Change the input black value to 50 and the input white value to 100. Stack the extra blur and levels.
Step 3: Color Detail to Halftone
Bring the footage pre-comp (the one that isn’t inverted) above the grid in the layer stack. Turn on its visibility. Drop the opacity of the footage to 18%. Create a transition to go from the original footage to the halftone version. Create a new solid that is 1920x1920 and name it “Circle Matte”. Bring the solid to the top of the layer stack. Click the Ellipse tool to create a circular mask the size of the solid. Change the value of the Mask Expansion to -960. Set a keyframe at frame 0. At frame 45 change the value to 155 to set another keyframe. Right click on the keyframe, click Velocity and set the Incoming influence to 80%. Duplicate the footage layer and bring the duplicate’s opacity back up to 100%. Bring the footage just below the “Circle Matte” and set its track matte to Alpha Inverted. Duplicate the mask inside of the circle matte and move its keyframes so they start at 3 seconds. Change the mode of the second mask to subtract. This will have the footage transition to the halftone and then transition back to the footage.
Part 2: 2 Best Halftone Effects Plug-In
1. Halftone – Aesweets
It is an advanced halftone effect plug-in packed with great features. You can create a drop-shadow effect with the Halftone – aesweets plug-in for a completely unique look. From changing the drop-shadow to stipes mode to applying the halftone to videos and all other layers, just tweak the setting and RGB color offset to create a unique particle look. You can give animation effect, connect the object with lines and also export to .png in just one click with Halftone aesweets.

2. HalfTone – Borisfx
It helps to create a halftone-version from the clip source by using white and black dot patterns. There is a range of parameters to be used to create a completely different halftone effect. The parameters like Blur Mocha, Mocha Opacity, Save and load preset, invert and resize mocha, combine masks, dot angle, smooth source, and much more are available to with various functions with the Borisfx after effects halftone plugin.

You may also like: Best Online Tone Generators >>
Conclusion
Creating a halftone effect is not much of a difficult task. Use the above steps to give halftone after effects to your clips in just a few steps.
Bring up your video to a professional level with straightforward tools.
Try It Free Try It Free
Liza Brown
chief Editor
0 Comment(s)